Well, like I mentioned before, the information I found that this machine might be using Le'Lit parts was a great lead. Searching the web, 1st-Line.com is the sole (I believe) distributor of Le'Lit espresso machines and parts. I contacted them on what I was looking for and what I was trying to do to see if they could help me. I was disappointed that they will only give technical support to the specific machines they sell and pretty much only help out customers that purchased machines from them. Esh. Really? Im looking to buy parts so won't I be a customer? But, I guess I understand as I'm sure they get bombarded with calls and questions from other coffee nerds like me, which can be a real time suck. At least they were kind enough to reply to my emails (thanks Jim) unlike the tecnosystem company itself and a few other places I tried.
Well, I looked at their parts online. Boy sure looks close to what I need. From what I saw, the model PL041 looks to have very similar components to my Tecnosystem Magic coffee. But hard to tell given the scale and such. In addition, there is a new model PL041, called the PL041QE which has a much improved boiler nut/jet and dispersion screen...Thats what I want too! SO, I took the leap and ordered the portafilter gasket, new jet, and new dispersion screen. No returns on these items so I was hoping I had it right!

The gasket fits perfect, and the diamater of the screen looks to be correct too....but bad news on the jet, as the threads are much finer than the threads on my boiler. So, the PL041QE seems to have a differnt boiler bottom half from the standard PL041 (and my boiler). You can see below the differences in the threads with the left showing the "pods adapter" I removed from my machine and the new jet on the right. I do think the old stype PL041 boiler jet/nut would have fit my machine, but I dont like the design of it so I didnt order it.

So, now my choices: 1) purchase a new boiler bottom half at a cost of $70 (with shipping) or 2) purchase the standard PL041 boiler nut and screen at a cost of around $50 or 3) turn the original pods adapter into a custom jet myself. The thought of spending more money on this machine does not sound appealing. If I buy more parts and they dont work, I cant return them so I would be out that money. Gosh, I dont plan on using pods...so.... LET THE MODDING BEGIN! I will have to turn the big hunk-O-brass on the left into something like the thing on the right.

My Mods!
Now, before I get too much into the details, let me say that I am showing you what I have done here for informational purposes only. It is in no way an endorsement or recommendation that you should do the same. If you choose to do any alteration or modifications yourself, you do so at your own risk and as your own responsibility. With that said...here we go.
Step 1. Drill a series of holes around the perimiter to remove as much material as possible to make cutting out that much easier.
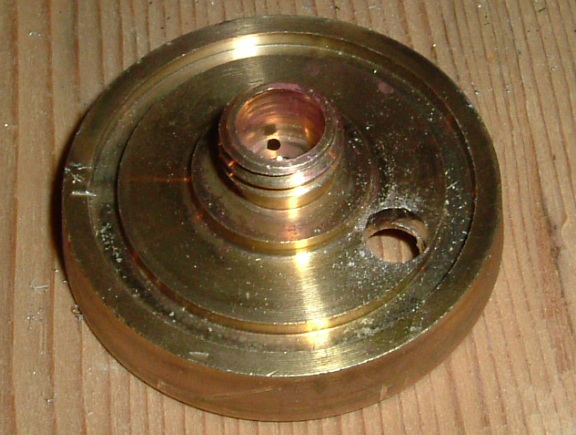
Step 2. Cut remaining metal to seperate inner portion from outer ring. Discard outer ring.

Step 3. My buddy Dave at Hay Springs Lumber and Hardware hooked me up with the right size and thread metric bolt to secure the jet to my drill press. I used this setup with the power off to hand file the big jagged edges. I then turned on the drill press and used a file to round and smooth the jet to the right size.

Step 4. I now have my roughly shapped jet. On the left is the purchased jet and on the right is my modded jet. While I am using the purchased jet as a model, I will have to custom fit the new jet.

Step 5. I continued to shape the modded jet to roughly mirror the purchased jet. Modded jet is on the left, purchased jet on the right.

Step 6. Final Jet shaping. Throughout this whole process, I would continually fit-check the modded jet in the expresso machine. It became obvious that the design of the new jet fits deeper into the PL041QE boiler, so I would now have to stop trying to model my jet so much after it. I kept removing material until my modded jet was flush with the outer edge of the boiler so I determined that was as far as I needed to go. I then cut a slot in the jet for a screw driver (or table knife,,,sorry honey) to be used to install and remove the jet. I also used a dremel to cut recesses into the modded jet top to allow water flow out the holes. I have a little polishing to do, but the final jet is show here below (modded jet on the right).

Installing my modded jet
Here is the original boiler bottom with nothing attached.

Here is the boiler with the new gasket and modded jet installed.

Here is the boiler with the new screen attached. I had to flatten the "cone" at the screw hole and use a small metric bolt to attach the screen.

I think it looks pretty damn awesome! And, I didnt have to spend any more money to get me to this point so ya gotta love that. Tomorrow,,,we do our first pull and see how this puppy works!
Hi Mark, yes I am still using the machine to this day.
ReplyDeleteWell! Some years on - and it's still proving useful to see your mods!!!! :D :D
ReplyDeleteHi there Mike,
I'm thinking of getting one of these - simply because I like the colour and it reminded me of my now-late sister's Gaggia... :D
However - Pods? no. I've got a Nuova Simonelli Oscar, and this is really for fun and tinkering - but it'd be nice to use it!
But a question please: how did you get the water-wand to steam milk? I too saw Kris's post - just before yours actually! But I still haven't quite figured that one out yet.
Is there any direction you could point me down? please?
Many thanks!
Danny.
darrien28@gmail.com
Hello from 2022. Thank you Mike. Your article helped me remake my Technosystem coffee maker.
ReplyDelete